
Welcome to Lake Fork.net
featuring:
ETS
Systems - Lake Fork, Texas
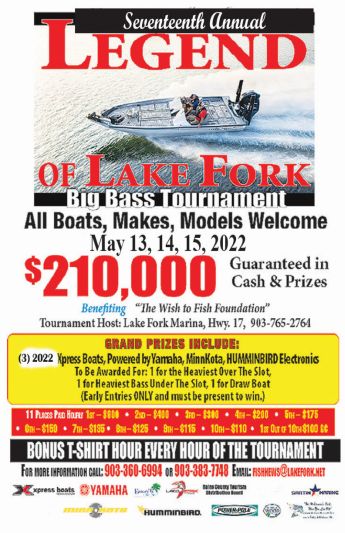
Legend of Lake Fork Big Bass Tournament
"Wish to Fish"
Foundation

Planning a trip to Lake Fork? Visit this website to find:
Legend of Lake Fork
Big Bass Tournament
Third weekend in May Annually...
The Legend of Lake Fork Open Bass Tournament
LegendofLakeFork.com

"Every child deserves a chance to fish!" Children diagnosed or who have experienced a life-threatening illness or accident sometimes do not have an opportunity. Now through the "Wish to Fish Foundation" they can have that day in the sun with their family.

Become a Sponsor
or Donate
No joy is greater felt than that of a child’s laughter while enjoying catching a fish. If
If you would like to share in this joy, simply contact:
Don Hampton
903-383-7748
or Email Us
WishtoFishFoundation.com
About Lake Fork
Lake Fork Reservoir has been enjoyed by thousands of bass fishing enthusiasts. Fishing has been particularly good due to fishery management efforts of the Texas Parks and Wildlife Department who began stocking Lake Fork with Florida largemouth bass in 1978. Lake Fork was opened for fishing in the fall of 1980. A state record largemouth bass weighing 18.18 pounds was caught from Lake Fork in January 1992.The lake has since gained the reputation as the hottest bass lake in Texas, perhaps in the USA. Lake Fork claims 70% of the Top 50 bass caught in Texas, the Top 6 ranging from 17.08 lbs. to the record 18.18. Fork is abundant with cover such as timber, grass, lily pads and underground springs which make it a great fishing habitat.
Legend of Lake Fork Big Bass Tournament
"Wish to Fish" Foundation

In Loving Memory of Kenneth Dean Law
June 18, 1934 - March 1, 2012
Click Here to visit Online Memorial
Website Design by
ETS Systems©2023
®All Rights Reserved